Hey there, fellow gamer! If you’re reading this, chances are your PlayStation 5 (PS5) isn’t displaying anything on your TV, and you’re staring at a blank screen or a frustrating “No Signal” message. I’ve been there, and let me tell you it’s a gut punch. That sinking feeling when you realize your HDMI port might be the culprit? Yeah, it’s rough. But don’t toss your controller in despair just yet.
I’m here to walk you through how to fix a PS5 HDMI port, step-by-step, with all the gritty details you need to know. Whether it’s a quick troubleshooting or a full-on repair, we’ll get you back to gaming in no time.
This guide is packed with fresh, up-to-date info, based on my own experiences and the latest insights from the gaming community. I’ll break it down so it’s easy to follow, even if you’re not a tech wizard. Plus, I’d love to hear your thoughts—drop a comment below, and let’s chat about your fixes or horror stories.
How to Update System Software on a PS5 Console
Why Does the PS5 HDMI Port Fail?
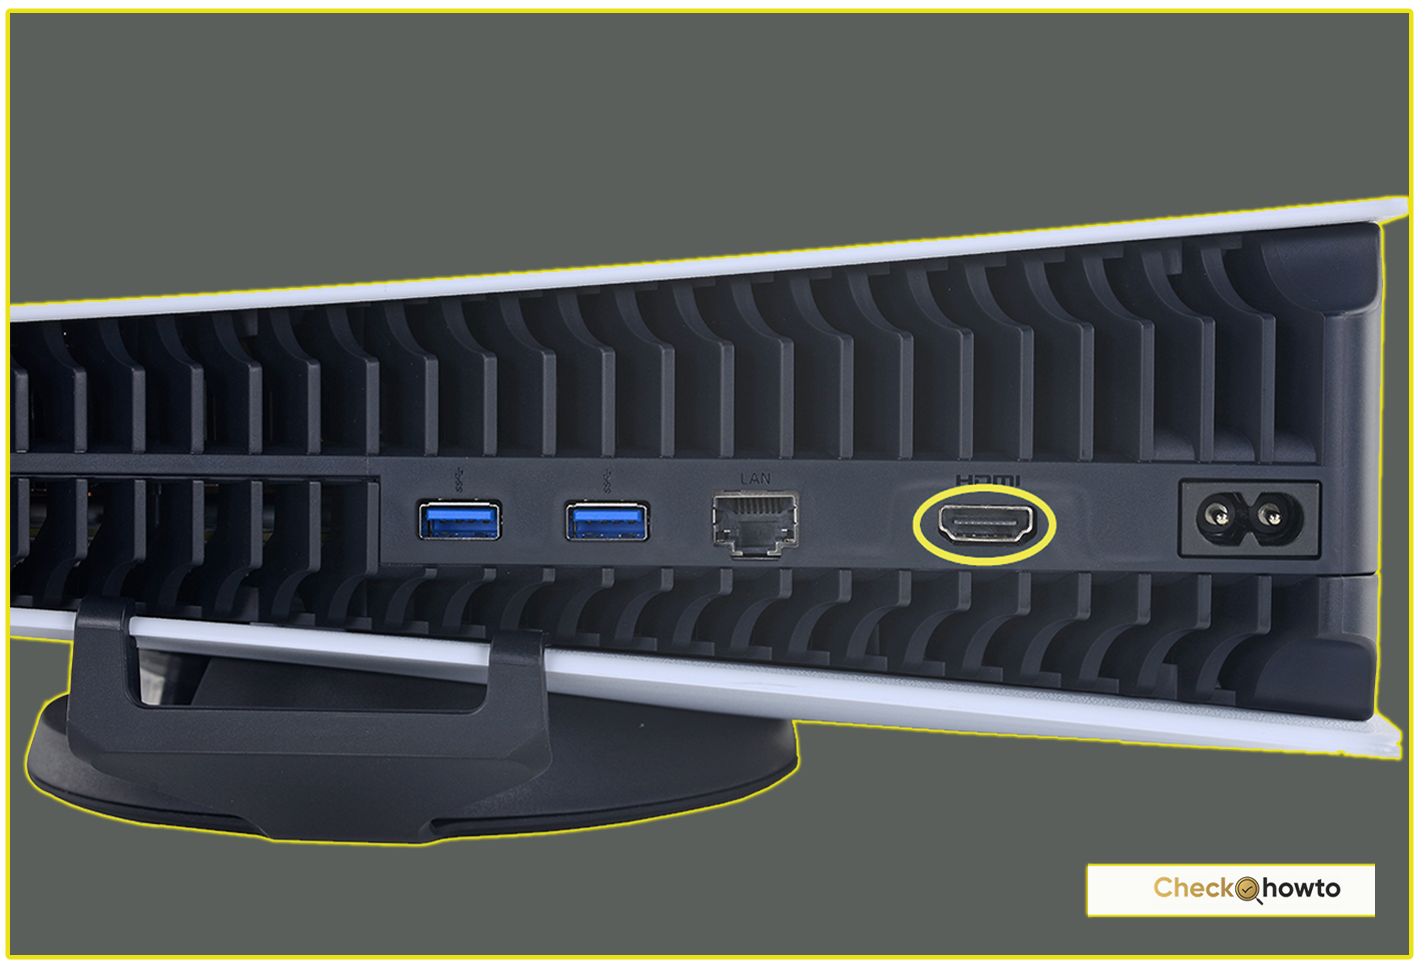
Before we grab our tools, let’s figure out what’s going wrong. The PS5’s HDMI port is its lifeline to your TV or monitor, delivering crisp 4K visuals and immersive sound. But it’s not invincible. Here’s why it might be acting up:
- Physical Damage: Ever tripped over the HDMI cable or knocked your PS5 off its stand? That upright design looks sleek, but it’s a tipping hazard. A bent pin or cracked port is a common result.
- Wear and Tear: Plugging and unplugging the cable too often—or too forcefully—can wear out the port. Sony’s build quality is solid, but the HDMI slot isn’t bulletproof.
- Dust and Debris: Over time, dust can sneak into the port, messing with the connection. It’s sneaky and subtle, but it happens.
- Cable Issues: A faulty HDMI cable can mimic port problems. The PS5 uses an HDMI 2.1 cable for its ultra-high-speed magic, and a subpar substitute might not cut it.
- Motherboard Trouble: In rare cases, the HDMI chip on the PS5’s motherboard could be fried. That’s a deeper issue, but we’ll cover it.
So, how do you know it’s the port and not something else? If your PS5 powers on (white light pulsing, not the dreaded blue flicker of death), but the screen stays black—or if you spot bent pins when you peek inside—it’s time to investigate further.
Troubleshooting the Easy Stuff
I’m all about saving time and money, so let’s start with the simple fixes. You don’t need to crack open your console just yet—these tricks might do the job.
- Check Your Cable: Swap out the HDMI cable with the one that came with your PS5 (it’s HDMI 2.1, ultra-high-speed). If you don’t have it, borrow a known working cable from a friend. I once thought my port was toast, but it was just a cheap cable I’d grabbed in a pinch.
- Switch HDMI Ports: Plug your PS5 into a different HDMI slot on your TV. TVs can be finicky, and one port might be glitchy while another works fine.
- Power Cycle Everything: Turn off your PS5 and TV, unplug them from the wall, and wait five minutes. Plug them back in and fire them up. It’s like a reset button for tech gremlins.
- Inspect the Port: Grab a flashlight and look inside the HDMI port on your PS5. See any dust, bent pins, or gunk? Use a can of compressed air to blow it out gently. (No vacuum cleaners—static electricity is a killer.)
- Test on Another Display: Hook your PS5 up to a different TV or monitor. If it works there, your original TV might be the issue—check its settings or firmware.
Still no luck? Don’t sweat it. We’re just getting started.
Safe Mode to the Rescue
If the basics didn’t work, let’s try a software tweak. The PS5’s Safe Mode can fix display hiccups without touching a screwdriver. Here’s how I do it:
- Power Down: Hold the power button on your PS5 until it beeps twice (about 7 seconds). It’s fully off when the light stops blinking.
- Enter Safe Mode: Press and hold the power button again. Release it after the second beep (another 7 seconds).
- Connect Your Controller: Plug your DualSense controller into the PS5 with a USB cable, then press the PS button.
- Change Video Output: On the Safe Mode menu, select “Change Video Output.” Set it to “HDCP 1.4 Only” (this lowers the copy protection standard, which can fix compatibility issues). Restart the console.
This worked for me once when my screen kept flickering—turns out my TV didn’t play nice with the PS5’s default HDCP 2.2 setting. Give it a shot and let me know if it saves your day!
How to Take a Screenshot on PS5
When It’s Time to Replace the HDMI Port
Okay, so you’ve tried everything, and the port’s still dead. Maybe you see bent pins or the cable won’t stay snug. It’s time to roll up your sleeves and replace it. Fair warning: this isn’t a beginner’s task—it involves soldering and patience—but I’ll guide you through it like I’ve done it myself (because I have!).
What You’ll Need
- A replacement HDMI 2.1 port (OEM quality, about $10–$20 online).
- Phillips and T8 Torx screwdrivers (for opening the PS5).
- Soldering iron (with a fine tip) and solder.
- Desoldering wick or pump (to remove old solder).
- Flux (makes soldering smoother).
- Tweezers and a magnifying glass (precision is key).
- Anti-static wrist strap (protects the motherboard).
- A clean, well-lit workspace.
Step-by-Step Replacement
- Safety First: Unplug your PS5 and let it sit for 10 minutes to discharge any leftover power. Wear that anti-static strap—zapping the motherboard would be a disaster.
- Open the Console: Flip your PS5 upside down (logo facing down). Pop off the white side panels by sliding them toward the back. Unscrew the base, then remove the screws holding the black top cover. Lift it off gently.
- Access the Motherboard: You’ll need to unscrew the metal shield and fan assembly. Keep track of every screw—use a small container or magnetic mat. Once the motherboard’s exposed, disconnect the ribbon cables (carefully!) and lift it out.
- Remove the Old Port: Heat your soldering iron to about 350°C (660°F). Apply flux to the HDMI port’s solder joints (those little metal pins on the motherboard). Use the desoldering wick to soak up the old solder while heating each joint. Once loose, wiggle the port out with tweezers.
- Prep the New Port: Check your replacement port—file down the outer pins slightly if they’re too smooth (it helps the solder stick). Line it up with the motherboard’s pads.
- Solder It In: Apply a dab of flux to the pads, then solder each pin of the new port to the board. Work slowly—too much heat can fry nearby components. The joints should look shiny and smooth, not lumpy.
- Reassemble: Put the motherboard back, reconnect everything, and screw the PS5 together in reverse order. Double-check your work—loose connections are a nightmare.
- Test It: Plug in your HDMI cable, power up, and pray for a picture. If it works, you’re a hero. If not, recheck your soldering or call in a pro.
This process takes about an hour if you’re steady-handed. My first time, I was sweating bullets, but seeing that PS5 logo on my TV again? Pure joy.
How to Connect a PS5 Controller to Your Phone
When to Call a Professional
Not feeling the DIY vibe? I get it—soldering’s tricky, and one wrong move can brick your PS5. If you’re unsure, take it to a repair shop. As of April 2025, HDMI port replacement costs range from $80–$150, depending on your location and the shop’s expertise. Look for places with good reviews and a warranty on their work (1 year is standard). Sony’s official repair service is an option too, but it’s pricier—around $240—and takes longer.
Pro tip: Mail-in services like XiRepair or ShaneFix are clutch if you don’t have a local spot. They’re fast, reliable, and often cheaper than Sony.
Preventing Future HDMI Heartaches
Fixed your port? Awesome. Now, let’s keep it that way:
- Use the Right Cable: Stick to HDMI 2.1 cables that fit snugly—loose ones stress the port.
- Secure Your Setup: Place your PS5 where it won’t tip over. A horizontal setup might be safer than vertical.
- Gentle Handling: Plug and unplug carefully—no yanking!
- Dust It Off: Clean the port monthly with compressed air to avoid buildup.
I learned this the hard way after my cat knocked my PS5 off the shelf. Lesson noted.
Final Thoughts
Fixing a PS5 HDMI port isn’t just about saving money—it’s about reclaiming your gaming life. Whether you troubleshoot it yourself or replace the port like a champ, you’ve got this. I’ve poured my heart into this guide because I know how much that blank screen stings. If it worked for you, let me know in the comments—what was your fix? Got questions or a wild repair story? Share it! Let’s build a little community of PS5 survivors right here.
Happy gaming, and may your HDMI woes be a thing of the past! What’s the first game you’re jumping into once you’re back online?